About
RainScatter is a web application designed to aid Radio Amateurs in making contacts on microwave frequencies by using precipitation particles as a scattering medium. It automatically downloads the near-real-time imagery and storm data from the National Weather Service to identify possible propagation paths between stations. It is designed to eliminate some of the guesswork in identifying potential scattering regions. The author hopes that it will foster interest in this exciting mode of propagation.
Sign up
To create an account you will need an email address to receive a verification code for completing the sign-up process. The steps to create an account are as follows:
- Press the Sign-In button on the map page
- Choose "Create and Account"
- Choose a username. Most people use their callsign for their username or some variant thereof. Your username is only used to identify your account in the Rainscatter applicaiton. It is not usually shown to other users. (You will set your displayed callsign when settting up your station information later.) Note: you can have multiple accounts tied to the same email address. You may wish to do this, for example, if you operate with a home station and as a rover.
- Choose a password.
- Submit the request. You will see a window asking for a confirmation code. You should receive the confirmation code in your email.
- Enter the confirmation code. This will confirm your account and log you into the application.
Setting up
When you first log in you should see other stations that have chosen to post their location. To set up your station, press the station setup ("gear") button. This will bring up a window for entering your station information.
| My callsign | The label for your station on the map that others can see. |
| Message | A message that is shown when others click on your station. This might be a phone/text number or other short informational message. |
| Degrees latitude/longitude | You station location. These can be typed in manually, but the might be more easily acquired from the a manually entered grid square or from geolocaiton services (e.g., GPS on a mobile device). You can also set your location by dragging your home marker on the map. |
| Post Location | When enabled, this will post your location on the map for other people to see. |
| Keep location when signed out | When enabled, this will leave your location visible on the map even when signed out. |
NOTE: To be visible to other users you must both set the "Post Location" switch AND press "Save" to be placed on the map.
Display
The interactive display is a zoomable map of the world. It shows radar imagery, location of storms and their visibility footprints, as well as other stations, beacons, and user-defined objects (described below).
Stations
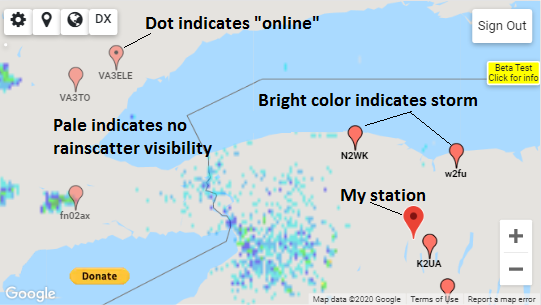
Stations are shown are map markers with a callsign. Pale color indicates stations that do not have any mutually visible storms with your station. This does not mean that a QSO isn't possible, just that there's no clear indication that a path is possible according to the available data. Bright colors indicate that there is a mutually visible storm cell according to the radar data. You may select the station on the map to highlight the storm cells that are visible between you and the selected station. Heading and distance information will be updated in the path information window.
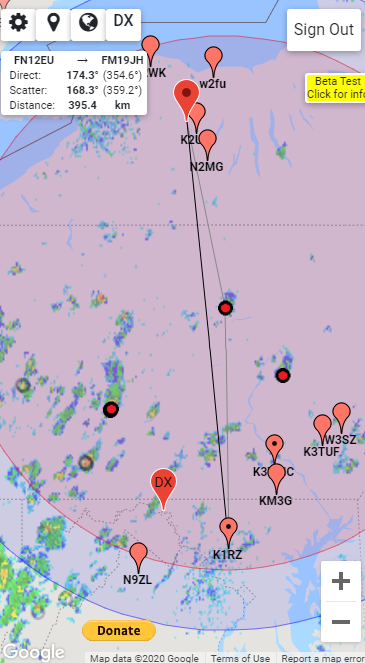
There is also a "DX" marker that acts as a wildcard location. You can drag this anywhere you like as a way of experimenting with paths or for quickly setting the location of another station that is not using the application. Its location can be set directly with the "DX" button at the top left of the window.
Beacons
The display of beacons can be toggled from the Map Settings menu. You can add beacons to your custom map objects. If you would like add a beacon to be available to all users contact the webmaster.
Map Settings
The type of imagery that is shown on the map can be changed/filtered by turning map layers on and off. This is done through the Map Settings button in the toolbar. In particular, the minimal settings may be best for low-bandwidth mobile devices.
Storms
Storms are indicated by small black circles or trianges on the map. Storms that are not visible appear as a faded gray color. Storms that are above your horizon are bold black. If you have selected another station, any mutually visible storms are shown as solid red or white indicating likely scattering targets for a QSO. You can select the storm to show path infomormation.
When a storm is selected, its location is updated every minute based on velocity information reported by the radar. When new information about the cell is available the postiion/velocity will be updated. The info panel will display antenna headings for the both the direct and scatter (if a scattering point is selected) paths. The reverse headings appear in parentheses. The direct path distance is also shown.
8/25/22 New storm cell indicators
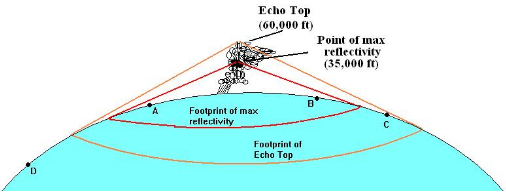
The storm icons use shape and color to distinguish storm hight and absolute reflectivity.
 A rain cell < 40,000 feet high
 A rain cell > 40,000 feet high
Additionally, mutually visible storms (those visible to both your location and a selected dx location) will have the core colored based on their absolute reflectivity. The reflectivity (measured in dBZ) is proportional to the amount of RF scattered back to the radar, and this may indicate that stronger signals are possible on other paths. An opaque white core used in these highly reflective storm cells is to contrast against the red/purple radar imagery that is usually painted behind them.
 A rain cell < 40,000 feet high, < 55dBZ
  A rain cell < 40,000 feet high, > 55dBZ
  A rain cell > 40,000 feet high, < 55dBZ
  A rain cell > 40,000 feet high, > 55dBZ
The footprint of the storm is indicated by two circles on the map. The outer circle shows the horizon that would be seen from the top of the storm. (The "top" of the storm is the highest altitude at which a reflectivity of greater than 20dBZ was received by the weather radar.) The inner circle indicates the horizon from the altitude of maximum reflectivity from the storm cell. The outer circles is what is used to determine visibility in the application.
Map Objects
You an create custom objects for you map from the "Add/remove custom objects" menu. Currently these include stations, beacons, and "locations". Any objects you add are visible only to you. This is useful for marking rover locations, adding stations to the map that are not using the system, and adding beacons that may be useful to you in your operation. Map objects are stored per account, so you will have them available to you if you sign in from another device under the same account.
Cleaner interface for mobile devices, contesting
On smaller mobile browsers the number of objects on the screen can make it difficult to see and select items of interest. It is now possible to hide all the stations on the map except your location and the DX location. This is useful, for example, when on a remote site if you want to quickly check if there is a path between you and another dx station. To do this, go to the "world" button in he upper left, and turn off "Show stations":
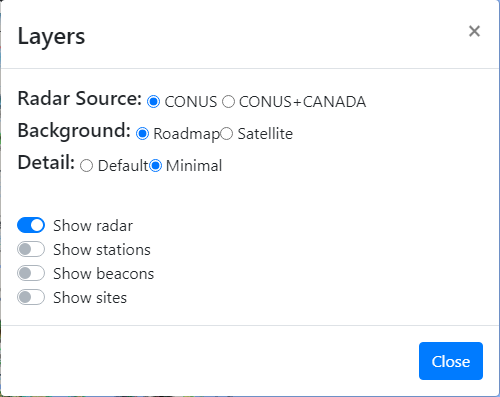
This example also shows the beacons and sites turned off, as well as the "minimal" roadmap display, which will both de-clutter the screen and save some bandwidth. (In extreme cases, even more bandwidth can be saved by disabling the radar imagery.) Pressing the DX button will prompt for a grid square, and upon entering a valid grid (up to 10 digits) the DX marker will move to that location. Selecting the DX marker will highlight mutually visible storms if there are any.
Adding a Beacon
Users can now create a beacon by creating an account a separate account to manage it. To avoid accidentally confusing data in the browser, This should probably be done from a separate browser or browser profile for the purpose. The only requirement needed for the station to show up as a beacon is that callsign contains a "/B". It will display to other users with a beacon icon when they have the "Show beacons" switch turned on. To create beacon for others to see, just create a new account for that purpose (sign out, and then create an new account from the login screen using a different browser or browser profile). An example of how to set up the callsign, message, and visibility is shown below:
Legal
Map contains information licenced under the Data Server End-use Licence of Environment and Climate Change Canada.